|
Sales | Introduction | Chapters 1 - 3 | Explore | News & Views | Home |
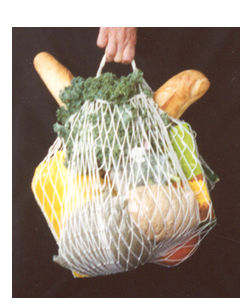
String Bag Instructions
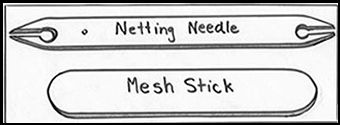
Materials RequiredNetting needle Netting Needle and Mesh StickIf you live by the sea in a fishing community you may find a netting needle and mesh stick in your local hardware store; however it's unlikely they'll be the size you need for this string bag. In fact, you'll probably have to do as I did and make your own. The mesh stick is easy to make; it's just a precisely measured flat wooden stick with rounded ends. The wooden netting needle is a bit tricky but well within the reach of a determined crafter. Here are diagrams and dimensions for the netting needle and mesh stick that I used in making the string bag you see here:
General Instructions for Making String BagThe bag is knotted together in 14 rounds from the center bottom outwards; its finished length is 17 in. Round 1 forms the grommet, a foundation circle of 28 meshes. The number of meshes is increased to 56 in round 2 to give the bag a circumference of 168 in. at full stretch. In round 13 the top opening is reduced in size and spaces are left to knot on the handle strings. A decorative edging of double half-hitches is worked in round 14. Finally, the handle strings are attached and knotted together with a series of double half-hitches. The netting needle carries the string while the knots are being worked and care must be taken not to overload the needle: too much string makes it too bulky to pass through the meshes. The mesh stick is used to form the grommet and, if desired, to form each mesh in rounds 2 to 12. Though cumbersome to use, the stick can be a help in making all meshes a uniform size, and its top edge can aid in seating the knots. However, the work goes more quickly without the stick, using the fingers to gauge the size of the meshes. It is important to get the knots seated properly: a tightened netting knot looks like a three-leaf clover and it is wise to keep a pin handy to unpick poorly seated knots. Tension is absolutely essential for knot-making. In working the body of the bag, tension is achieved by placing the grommet over a large button attached to a piece of cord suspended from a wall hook or the back post of a kitchen chair. Such arrangements also allow the work to hang freely. The tension-cord can be knotted shorter to maintain a comfortable working level as the bag gets longer. ROUND 1 THE GROMMET Load needle with 195 in. of string. Unwind 36 in. and make a slip knot in it, exactly as shown. The foundation loop above the slip knot must be 5 in. long. Diagram 1 To provide tension, hook the foundation loop over a nail or pin it securely to a surface such as a cork board. Leave loose end hanging at the left. Place mesh stick directly below slip knot on top of loose end. Diagram 2 Making the netting knot: Bring working string down over front of mesh stick then under and behind stick; now pass it through the foundation loop from back to front. Diagram 3 Hold the working string in place with your left index finger, then take the string to the left and hold it there with your left middle finger. Bring string to the right over the foundation loop then behind the foundation loop; now bring it out to the front through the loop on the left. Diagram 4 Bring the working string down in front of the mesh stick, making certain that the netting knot has seated itself correctly next to the slip knot. Diagram 5 Make 26 more meshes, as described, counting the loops around the mesh stick not the knots. Diagram 6 After completing the meshes, remove work from stick and take loose end over top of work and pass it through what is left of the foundation loop. Hold the loose end just above the slip knot and pull it to the left so that the foundation loop tightens over it at the other end of the work. Diagram 7 Pull the loose end farther so that it tightens over the top of the knots and makes the meshes fan out in a circle. Secure the work by tying the working string and the loose end into a square (reef) knot close to the netting knots. Make a final (28th) mesh by tying the loose end and the working string in an overhand knot level with the outer edges of the other meshes. (It is awkward making an overhand knot with the working string attached to the netting needle. However, it can be done and it gets easier with practice.) Diagram 8 ROUND 2 Place grommet over a large button attached to a tension-cord. Leave loose end hanging at left of work. Diagram 9 Two meshes are worked into each mesh of the grommet. Place mesh stick below the overhand knot which formed mesh 28 of the grommet and work a netting knot into this mesh. Diagram 10 Remove stick and move it to the right, placing it below mesh 1 of the grommet. Work one netting knot into mesh 1, then take the string around the stick again and pass it through mesh 1 again. Make a second netting knot above the first. Diagram 11 Continue to end of round. Make mesh 56 by tying the loose end and the working string in an overhand knot level with the outer edges of the other meshes. NOTE: To make netting knots without using the mesh stick: Pass working string through mesh and bring it down in front. Hold string securely with right thumb and index finger. Place left middle finger in previously completed mesh and use left index finger to even up the new mesh. Diagram 12 Transfer left thumb and index finger to netting knot position. Hold securely and work knot as usual. NOTE: The netting needle will need to be reloaded during round 2. To attach new string: Finish off old length of working string with a netting knot as usual. With the new string, work another netting knot into the same mesh, directly above the knots made with the old string. Leave 3 in. tag ends on both old and new strings. These can be tied into a netting knot above during round 3. When trimmed, these tag ends are nicely hidden. ROUNDS 3-12 Work netting knots in the manner just described into each of 55 meshes in each round. Make mesh 56 as usual. ROUND 13 To reduce the size of the top opening and leave spaces for knotting on the handle strings: Reduce meshes 1-5, 7, 9, 11-17, 19, 21, 23-33, 35, 37, 39-45, 47, 49, 51-55 to 5/8 in. in width. Reduce meshes 6, 8, 10, 18, 20, 22, 34, 36, 38, 46, 48, 50 to 1 3/4 in. in width. Make measurements carefully; it is important that the handle strings be positioned correctly so that the bag will be well balanced. Use fingers, a tape measure and pencil marks on the string to form the meshes in this round. Make mesh 56 as usual. Cut strings leaving 1 in. tag ends. Diagram 13 ROUND 14 It is quicker and easier to work the decorative edging before the handle strings are knotted on. Reload netting needle and secure tension-cord to top string of bag. To make a double half-hitch: Pass working string over and around top string, leaving a small loop at left, then bring string through loop from back to front so that it forms one half-hitch. Pull tight. Repeat this step but pass string under the top string. Work two double-hitches into each 5/8 in. mesh and four double half-hitches, two on each side, into each 1 3/4 in. mesh. Begin in mesh 1 and use hitches to hide tag ends. Diagram 14 HANDLES Secure tension and load netting needle with 112 in. of string. All handle strings are 9 1/2 in. long, knot to knot, and pencil marks on the working string are an enormous help. Work a netting knot into mesh 6, leaving an 8 in. tag end. Loop the string to mesh 22 and work knot; loop back to mesh 8 and work knot; loop to mesh 20 and work knot; loop back to mesh 10 and work knot; loop to mesh 18 and work knot. Cut string leaving an 8 in. tag end. Make second handle in same manner, working knots into meshes 34, 50; 36, 48; and 38, 46. Note: The 8 in. tag ends become part of the handle and the extra bulk makes it more comfortable. To finish handles: Load netting needle with 120 in. of string and secure tension-cord below base of handle. Wrap handle strings together at their base; a garbage bag tie is perfect for this. Begin double half-hitches 2 in. above base, leaving a 8 in. tag end. Double half-hitches are worked around strings, including tag ends, to within 2 in. of opposite base. Cut string, leaving short tag end which can be threaded under the knots. Reload needle and work second handle in same manner. The bag is now complete. ********** |
||||||||||
| Sales | Introduction | Chapters 1 - 3 | Explore | News & Views | Home | Top |